What Should I Do If My Dreads Start Slipping?
you wake up, roll out of bed, and catch a glimpse of yourself in the mirror. Your synthetic dreads, which once framed your face so perfectly, are looking… not that fresh.
A little loose here, a bit of a frizz halo there, and those once-tight braids along your neck seem to be shifting. You pull off your bonnet and there’s a rubber band hiding in the folds of your pillowcase, this isn’t the first one you’ve seen and it just might be time for a refresh…
It’s frustrating, right? You worked hard to get your dreads installed, and now it feels like they’re working against you. Slipping dreads? totally normal, and they’re easy to fix. The solution? A refresh routine that brings your dreads back to life without the hassle of uninstalling them.
Let’s break it down step by step, starting with why dreads loosen, how to spot when they need attention, and what you can do to make your hairstyle last longer.
Why Do Dreads Loosen?
Slipping dreads can happen for a bunch of reasons. Everyone’s hair is different. If your natural hair is soft or fine, your braids might loosen faster than someone with curlier hair. Activities like sleeping, playing sports, or even just tossing your hair into a quick ponytail constantly can also play a big part in loosening the braids!
And then of course, there’s the installation itself which is pretty common for a lot of women. If your dreads weren’t installed properly (think uneven sections, poor parting, or rubber bands that just don’t hold up) you might find yourself needing to refresh sooner than expected.
The truth is, hair just does its thing! No matter how perfect your dreads were when they were first installed, life happens and things shift. You can’t stop life from happening! You throw your hair up in a messy bun for the gym, let it dance around during a picnic date or cozy up on your pillow at night.
We all know that hair isn’t something that stays still! it moves, grows, and adjusts to everything you do. Even simple things like tossing it over your shoulder, tucking it behind your ear, or tying it up for the day all play a part. And as your natural hair starts to grow, you’ll notice small gaps forming at the roots where the dreads were first installed. That’s totally normal and happens to everyone!
But let’s talk about a couple of reasons your dreads might start slipping. First up— if you’ve used some of those pesky rubber bands… If you’ve worn synthetic dreads for any amount of time, you’ve probably had your fair share of bad luck with them. They’re flimsy, unreliable, and honestly, you can only count on them for one thing—breaking at the absolute worst possible moment.
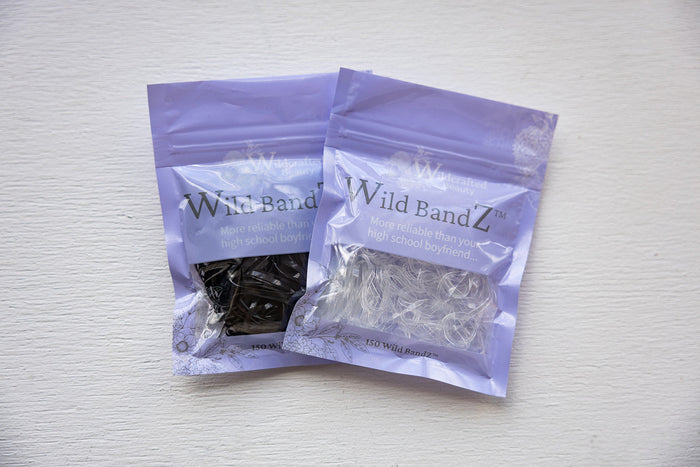
Which is exactly why we decided to take matters into our own hands and custom-design our very own. These are clear, durable, and practically invisible and the coolest thing? They blend so well with any dread color. Wild BandZ are made to last, holding your dreads securely for weeks on end without snapping or stretching out. They’ve been tested by real dread wearers—women who use Crown Nectar daily—and have earned their reputation as “break-proof.”
Here’s what women who have tried it have said about it so far:
“3 weeks in and these Wildbandz are by far the best bands i’ve ever used! I was skeptical because every single clear band I've ever used was horrible and broke within a couple of days. These Wildbandz? Not a single one has snapped! I’ve even done multiple refreshes after showering, changing out colors and reused said bands! Berlin, you and your team are amazing!” —- Joni P
“I just took out my first install with the Wildcrafted Wildbandz and it’s the first install I've ever had where not a single band has popped!” –Mallory D
“The Wildbandz are seriously amazing. I really didn’t think they would compare to another good brand but no…. She knocked it out of the park. They are the perfect size and stretch well over the dread without snapping. It’s a game changer for sure.” —- Trish L
The Importance of a Proper Installation
The secret to long-lasting synthetic dreads starts with the install. Your hair should be parted into neat, evenly spaced boxes to ensure the weight of your dreads is distributed evenly.
Tip: It’s best to do only three sections at the bottom part of your head so that we’re avoiding pulling and any potential tension bumps!
Many of our customers have reported that new techniques like the crochet hook method or blanket braid can help create a secure foundation that won’t pull too hard on any one section of your scalp.
Not sure where to start? When you order from Wildcrafted Beauty, you’ll receive an exclusive installation course video. This step-by-step guide walks you through the entire process, making it easy to DIY or show to your stylist!
But even with the best installation and the best rubber bands to hold your hair in its place. Dreads naturally loosen over time. It’s actually a part of their charm, so a refresh is pretty much always needed to achieve that cleaner look!
The 2-Week Spot Refresh
Here’s the thing about synthetic dreads: not all sections of your head loosen at the same time. Areas like the braids around your face, the center of your head where you parted and the bottom of your neck—are more likely to need attention sooner. That’s why we recommend a partial refresh every two weeks to keep these areas looking clean and neat!
Think of this as a quick touch-up! Wanna see what that looks like? Watch our youtube video on how to quickly do it here! Or a more detailed install and refresh one here!
Here’s a little tip from Berlin herself: If you can slide your pointer finger through the base of a braid, it’s time to refresh. Start with the front row, where looseness is most visible, and work your way to the center part and the braids at the nape of your neck.
Your Dreadlock Refresh Kit!
Here’s what you’ll need:
-
Wildbandz: Say goodbye to broken elastics with our durable, clear rubber bands, designed specifically for dreadlock wear.
-
Cooling Veil or Soothing Veil: Hydrate, soothe, and refresh your natural hair before re-braiding. This really helps in making your process smoother!
-
Crown Nectar: Add moisture, shine, and softness to your dreads for a finishing touch that lasts.
-
A Fine Tooth Parting Comb.
Here’s your step-by-step guide to help you understand the process better!
Start by removing the rubber band. Avoid using rubber bands that snap, stretch out, and simply don’t last. That’s where Wild BandZ come in specially designed for dreadlock wear, lasting up to six weeks without a single snap. We also add a special rubber band cutter that helps you easily cut older bands to save time!
Unbraid and detangle. Gently unbraid the loose section, being careful not to tug too hard on your natural hair.
Refresh your hair. Spray your natural hair with Cooling Veil, our hydrating mist that soothes your scalp and keeps your strands moisturized. This step makes re-braiding easier and reduces tension on your hair.
Then comb the strand, don’t be surprised if you see some shedding—this is completely normal! Protective styles like dreads trap daily hair fall, so when you unbraid, you might notice several weeks’ worth of shedding all at once which could look something like this:
Re-braid and secure. Fold your synthetic dread in half (or braid it down for extra length) and begin re-braiding your natural hair around it. Once you’re done braiding, secure the braid with another of our Wild BandZ for a long-lasting hold!
This process takes about an hour for each of the front row of your head, center where you have parted and that bottom back row. It’s a little bit of time that makes a big difference in how your dreads look and feel!
One of the most common questions we get with people who are just starting out with dreadlocks is:
“Why am I losing so much hair when I refresh or uninstall my dreads?”
The answer is simple: it’s not that you’re losing more hair—it’s just all coming out at once. Which is why this looks totally normal!
On average, we lose about 100 strands of hair per day. With synthetic dreads, those strands get trapped in the braids instead of falling out naturally. When you unbraid during a refresh, all that trapped hair comes out at once. It might look like a lot, but it’s completely normal.
Think of it this way: instead of finding hair in your shower drain every day, you’re just catching up on a month’s worth of shedding all at once
Why Regular Refreshes Matter!
Letting your dreads stay loose for too long can lead to more than just a messy look. Twisting, tangling, and excessive pulling can damage your natural hair, leading to breakage or even tension bumps. By sticking to a refresh schedule—every two weeks for your front, center and back of your head and every four weeks for your whole head—you’re not just maintaining your style and making sure it looks neat, you’re also protecting your natural hair underneath and getting rid of that hair that’s ready to go!
Taking care of your synthetic dreads doesn't have to feel overwhelming or scary. We’re here to remind you that you’re never alone in this journey! Whether you’re refreshing your dreads, looking for tips or even just looking for a community of women who all love the same hairstyle. We have it! And if there was ever a dreadlock-related question, it has probably been answered there already!


